This post is the first of a series of posts which takes a detailed look at the Revenue Cloud Pricing Procedure and attempts to explain how the pricing elements are used with the Pricing Procedure, the data points which are referenced, and the outputs which are produced.
We’ll start in this post by looking at how a quote line product list price is obtained and how this is then processed to calculate total quote line price. We’ll also review the use of Sales Price to over-ride List Price and how this is managed by the Pricing Procedure.
As a first point of reference to the concept of Pricing Procedures within Revenue Cloud see the previous post Salesforce Revenue Cloud Pricing Architecture. This explains at a high level how the Pricing Procedure is architected using the Salesforce Expression Set technology, and how it consists of a number of specialised pricing elements which can be configured to manage the process of calculating prices on a quote line by quote line basis. The full range of elements available in the Pricing Procedure are described in the above referenced post and this post builds on this to we take a deep dive into the details of the following elements.
- Pricing Setting
- List Price
- List Group
- List Operation
- Assignment
- Formula Based Pricing
We also saw in the earlier post Setting up Revenue Cloud – A Walk Through to the Quote how to create a default Pricing Procedure, and if we open this we are presented with a long list of elements used within the procedure – Almost 50 elements in total, and over 20 List Groups which group elements within a container concept.
The Pricing Procedure also references a Context definition as described in the previous two posts and the default Context definition refers to hundreds of data points with entities such as Nodes and Attributes, Object field mappings, and context tags to consider.
As we start to configure Revenue Cloud to manage our pricing mechanisms and as we start to explore additional customisations required for our specific products and pricing requirements it is important to understand how these elements work, and what these referenced data points mean. It is therefore necessary to deep dive into the Pricing Procedure and examine in the detail these constituent parts.
In order to do this we will unpack the Pricing Procedure and re-generate it by creating a Pricing Procedure from new and build this up over a series of posts, each of which attempts to explain the detail behind specific pricing elements and the detailed mechanisms employed by these to deliver our pricing model and resulting price outputs.
We will start here by creating a new Pricing Procedure.
From App Launcher select Pricing Procedures – select New – enter Name [Pricing Procedure Unpacked], select usage Type Pricing, select the Context Definition we created in our earlier post [RevSalesTransactionContext]
We then see Pricing Procedure Unpacked V1 listed under Pricing Procedure Versions. Click on this to open.
We then need to add our Pricing Elements. Click on + under Add Step Elements
Select Pricing Setting from the list of elements shown.
Expand Input Variables and Output Variables section within this by clicking on the chevrons. We now need to enter the required Context tags as shown in screenshot below.
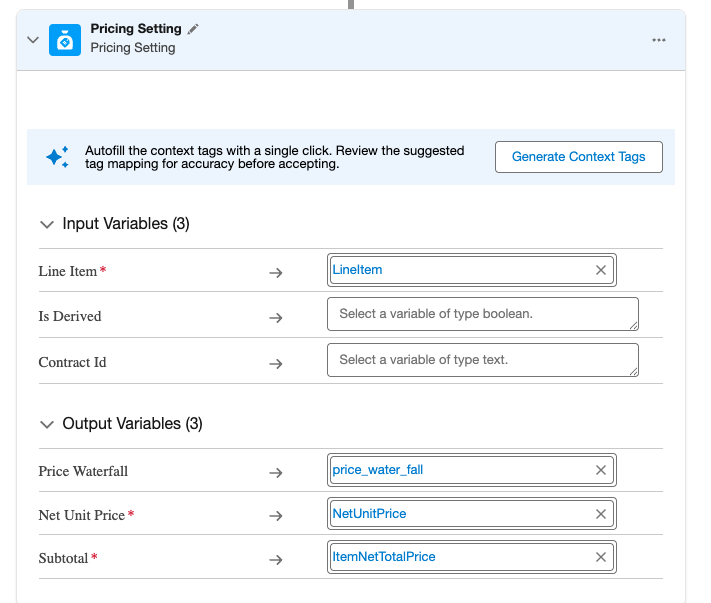
Price Setting is a required pricing element and must be the first referenced element in the Pricing Procedure. The Context tags shown are used to drive its internal mechanisms.
Context tags are provided by the Context Definition we defined for the Pricing Procedure on creation. To understand Context tags in relation to the source Salesforce object fields we go to our Context Definition via Setup.

From Context Tags tab we can search for specific tag name listed under Attribute Tags and see the corresponding Attribute Name for this tag.
We can then move to Map Data tab and from QuoteEntitiesMapping entry we can select Edit SObjects mapping.

This shows the mappings in place between the Context Nodes and Attributes and the Salesforce Objects and fields. For our deep dive into the Pricing Procedure we will be principally referencing SalesTransaction and SalesTransactionItem Attributes.
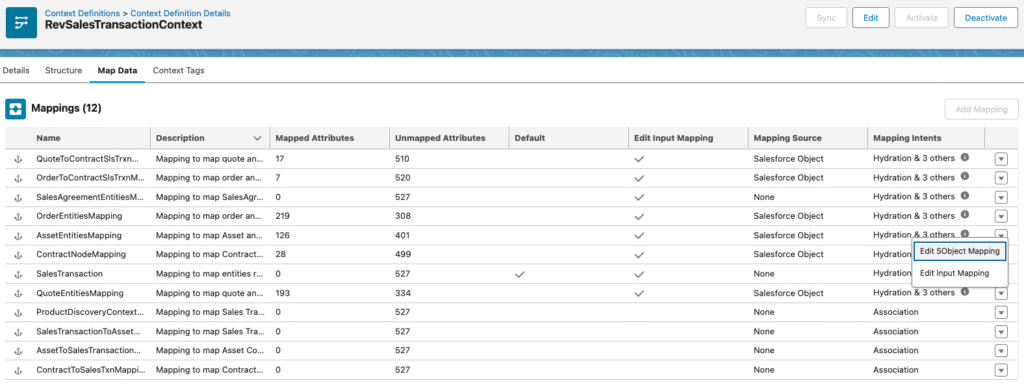
[Further details on the makeup of the Context will be the subject of a future post].
Context tag mappings for our Price Setting element tags are shown in the table below:
| Tag | Attribute name | Object field mapping |
| LineItem | SalesTransactionItemSource | QuoteLineItem:Id |
| price_water_fall | PriceWaterFall | QuoteLineItem: PriceWaterFallIdentifier |
| NetUnitPrice | NetUnitPrice | QuoteLineItem:NetUnitPrice |
| ItemNetTotalPrice | NetTotalPrice | QuoteLineItem:NetTotalPrice |
The Price Setting element has an Input Variables section and an Output Variables section.
Within Input we have a single mapping between an internal variable Line Item and the tag LineItem which from above table we can see maps to the QuoteLineItem ID field.
Within Output we have internal variables Price Waterfall, Net Unit Price and Subtotal each mapped to their corresponding tags shown in above table and from which we can then map to the QuoteLineItem fields shown.
As mentioned earlier these are necessary mappings for the internal working of the Pricing Procedure.
To add our next pricing element Click on + below Price Settings element and select List Price from the list shown.
Expand Input Variables and Output Variables section within this. We now need to enter the required Context tags as shown in screenshot below plus the Lookup Table Details reference.

We can then use the Context tag reference to understand the mappings to the corresponding Salesforce Object and fields and this is shown in the table below:
| Tag | Attribute name | Object field mapping |
| Product | Product | QuoteLineItem: Product2Id |
| PriceBooks | Pricebook | Quote:PricebookId |
| ProductSellingModel | ProductSellingModel | QuoteLineItem: ProductSellingModelId |
| LineItemQuantity | Quantity | QuoteLineItem:Quantity |
| ListPrice | ListPrice | QuoteLineItem: ListPrice |
| ItemNetTotalPrice | NetTotalPrice | QuoteLineItem:NetTotalPrice |
We also have reference to a Lookup Table – Price Book Entries V2. We can examine this Lookup Table from App Launcher – select Lookup Tables – select Price Book Entries V2 from the list.
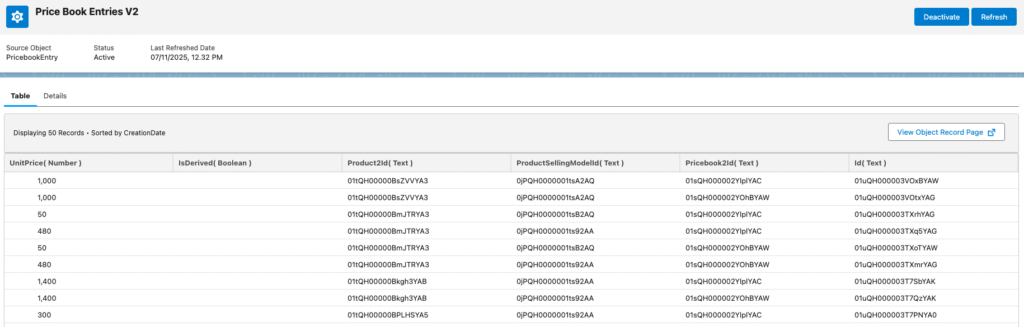
In our previous post Salesforce Revenue Cloud Pricing Architecture we showed how the Price Book Entries Lookup Table / Decision Table is sourced from the Salesforce Price Book entries object and kept up to date using the refresh operation.
The Price List element also has an Input Rule Variables and an Output Rule Variable section. This is used by the lookup table where we have as input – Product, Price Book, and Product Selling Model. From these inputs the lookup table outputs – Price Book Entry Id, and Is Derived
Following this there is an Input Variables and Output Variables Section.
For input we have Quantity and List Price Field.
Quantity uses the LineItemQuantity tag which sources data from QuoteLineItem Quantity field.
List Price Field references a constant defined within the Pricing Procedure, which has a default value, UnitPrice, which is another output from the lookup table.
For output we then have List Price and Subtotal which are mapped to the tags ListPrice and ItemNetTotalPrice. These then map through to the QuoteLineItem fields – ListPrice and NetTotalPrice via the Context as shown in above table.
So we now have a Pricing Procedure containing 2 pricing elements. Click Save and Activate.
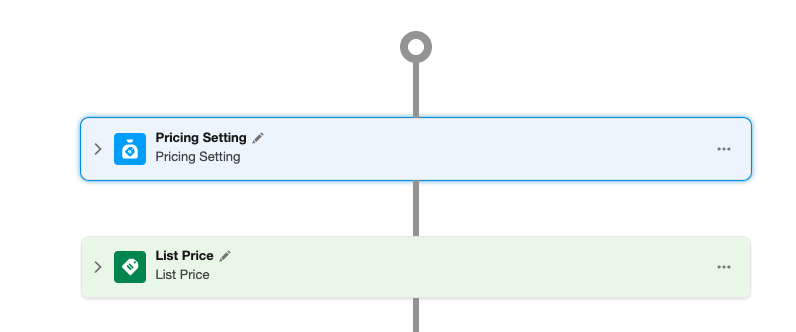
This will enable us to setup a quote line with a selected product and display the List Price and Net Total Price following the logic as defined above using these two elements.
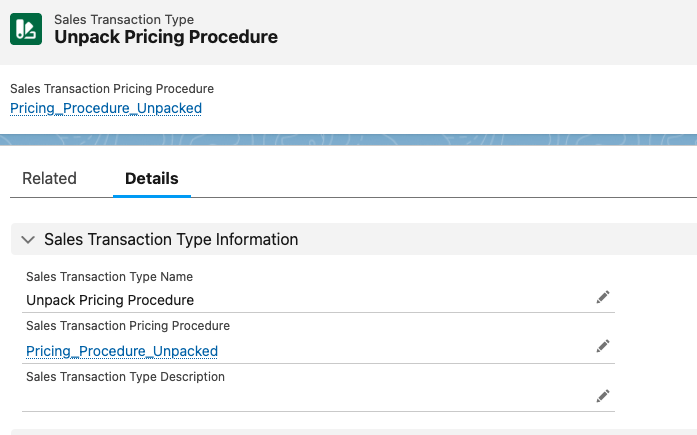
In order to use this custom Pricing Procedure within a Quote instead of the system default Pricing Procedure as specified in Pricing Setup we need to create a Sales Transaction Type record.
From App Launcher select SalesTransaction Type and enter details shown below to reference our new Pricing Procedure – Pricing Procedure Unpacked
We can then reference this Sales Transaction Type from our quote record.
To do this we need to add the Sales Transaction Type field to the Quote Page Layout.
If we now create a new Quote – From App Launcher Select Quote – Enter Quote Name – Select Sales Transaction Type lookup field and choose Unpack Pricing Procedure.
Then from our Quote – Select Lines – Select Browse Catalogs – Select Price Book Digital Art – Select the Digital Frame Product from the Digital Art catalog – and we see the following on our Quote Line Item

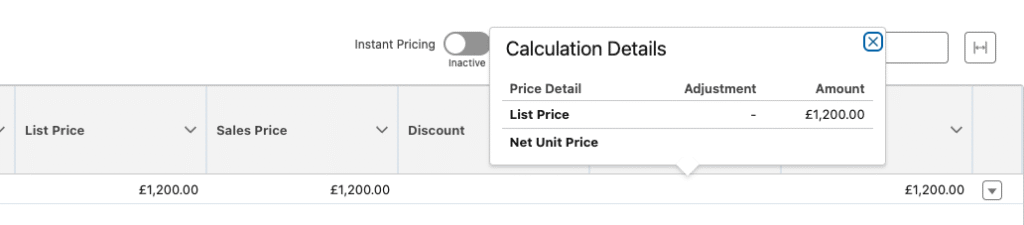
Note we have List Price and Total Price displayed for our product. These values are output from our Pricing Procedure List Price element as described above. Also note Net Unit Price is blank. This is not an output from our current Pricing Procedure.
If we hover over Net Unit Price we can see Calculation details displayed. This help us understand how our pricing is arrived at. Currently it just shows List Price.
If we make some changes directly on the Quote Line we can see the limitations of our current Pricing Procedure.
- Change Quantity to 2
- Enter Sales Price of £1100
- Enter Discount of 10%
We can now see our price adjusted based on updated quantity only. Sales Price and Discount changes are not reflected. This is because our Pricing Procedure is not configured for these additional data points and so they have no effect on Total Price – Only the Quantity adjustment which was referenced in our List Price data tags as described above.

Lets now extend our Pricing Procedure to include reference to Sales Price and also output Net Unit Price.
From App Launcher – Select Pricing Procedure – Select Pricing procedure Unpacked – Select Pricing Procedure Unpacked V1.
We now see our Pricing Procedure elements.
To add our next pricing element Click on + under List Price and select List Group.
This creates a List Container with a List Operation within it. The List Container and List Operations enables us to filter the quote lines and apply additional pricing elements to quote lines selected by this filter.
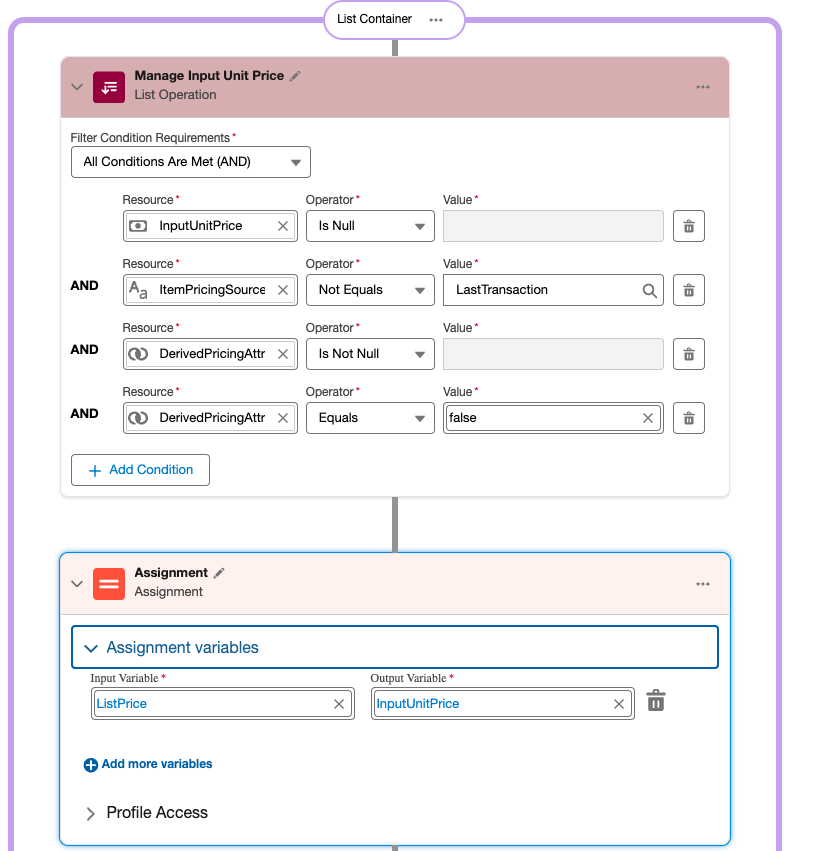
Configure the List Operation with resource data tags and title as shown below, plus add the Assignment element beneath List Operation and configure the Assignment element with the Input and Output variable tags shown.
The table below shows the tags used in these elements added and their mappings via the Context.
| Tag | Attribute name | Object field mapping |
| InputUnitPrice | UnitPrice | QuoteLineItem:UnitPrice [Sales Price] |
| ItemPricingSource | PricingSource | |
| DerivedPricingAttribute | DerivedPricing Attribute | |
| NetUnitPrice | NetUnitPrice | QuoteLineItem:NetUnitPrice |
For the elements added we have a List Operation which filters for records where InputUnitPrice is null and for those records we execute the Assignment element which sets InputUnitPrice to ListPrice. From the above table we can see that InputUnitPrice corresponds to the Sales Price on our Quote line. [for the purpose of this explanation we will skip references to ItemPricingSource and DerivedPricing].
Now add the following elements.
Click on + under the above List Container and select List Group.
Configure the List Operation with resource data tags and title as shown below, plus add the Assignment element beneath List Operation and configure the Assignment element with the Input and Output variable tags shown.
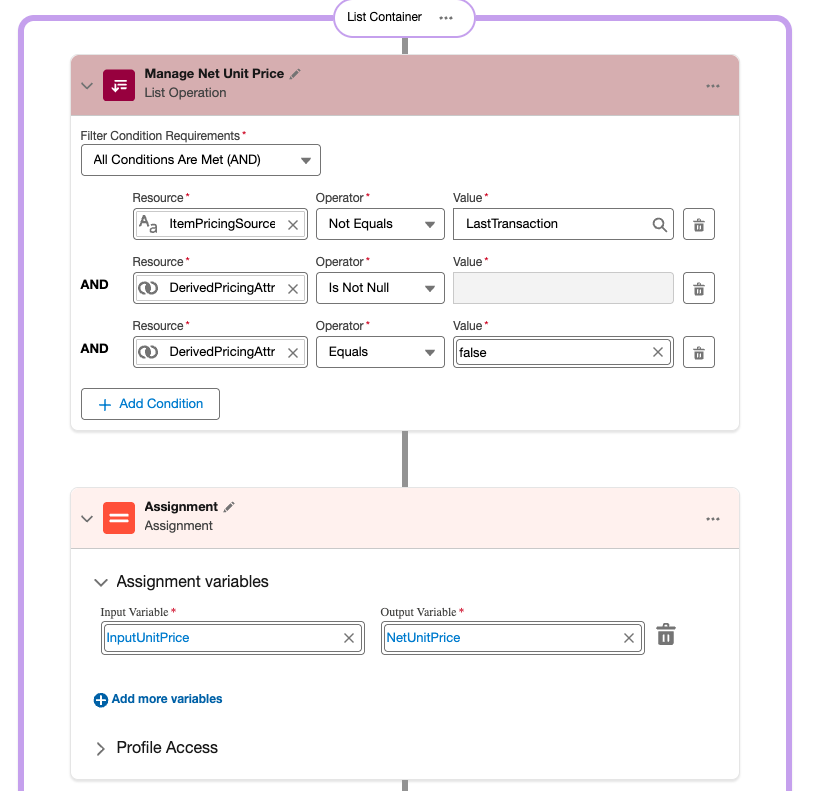
For the elements added we have a List Operation which filters for records where we are not deriving our pricing from other quote line sources [this will be explained in detail in a subsequent post]and for those records we execute the Assignment element which sets NetUnitPrice to InputUnitPrice.
We then add a Formula Based Pricing element as shown below.
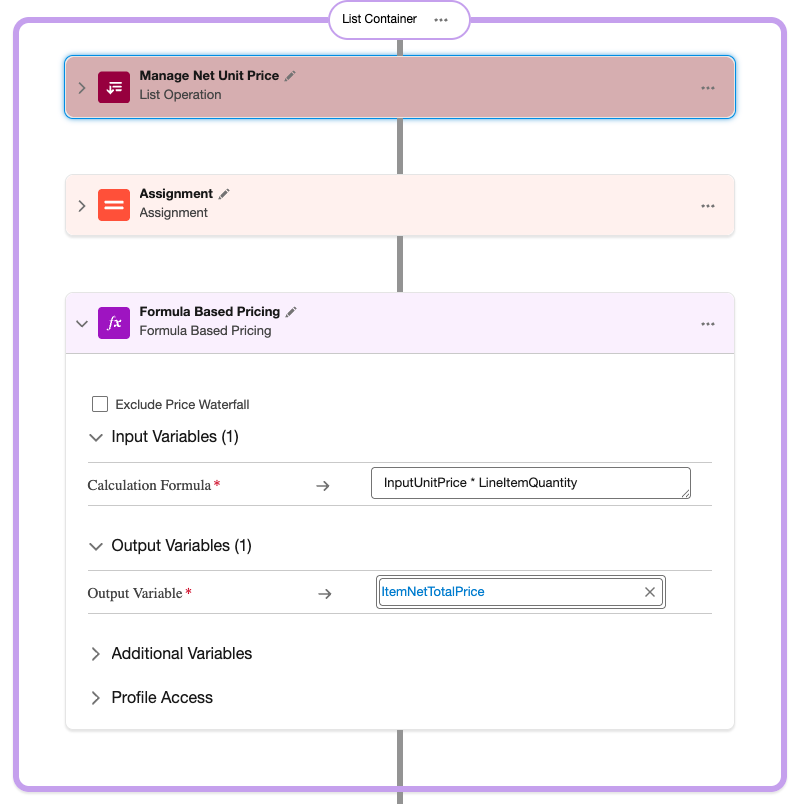
Within the Formula element we calculate InputUnitPrice x LineItemQuantity and then output this as ItemNetTotalPrice.
So our Pricing Procedure Unpacked V1 now looks like the following.
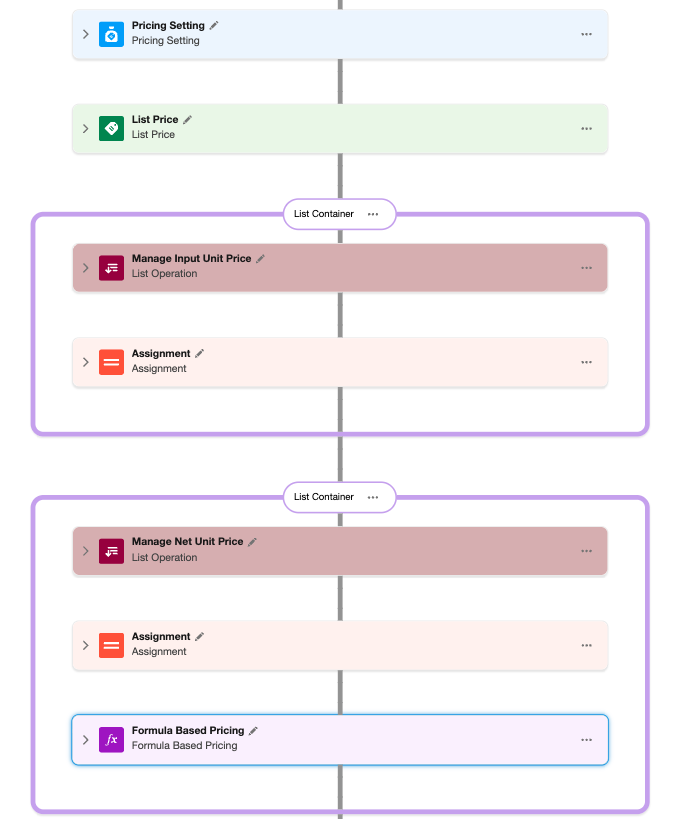
Save this Pricing Procedure and Activate.
If we now go to our quote line and enter a Sales Price we now see Net Unit Price appearing and Total Price reflecting Sales Price and Quantity.

From this exercise we can see there is significant complexity in understanding the mechanics within the Pricing Procedure and our version 1 above only deals with List Price, Sales Price and Quantity, and contains only 7 elements. The default Pricing Procedure has close to 50 elements.
It is important however to understand how the Pricing Procedure is constructed and the operation of each of the elements. If we wish to customise our Pricing Procedure and introduce our own pricing processes and rules then we need to know where to start in relation to the standard Pricing Procedure elements and the data tags which we should be adding or manipulating based on our requirements.
Understanding the mechanics of the Pricing Procedure also gives us an insight into the power and the flexibility of Revenue Cloud in managing complex pricing rules and scenarios. The default Pricing Procedure delivers out of the box a complex price waterfall mechanism which we shall explore in further posts and can be extended and customised. This is one of the significant benefits which Revenue Cloud delivers.